Thursday, June 19, 2014

Fixing the sensor

As you will recall from the last post, I had broken a couple of pins on one of the three opto-interrupter limit sensors that came with the kit.  I ordered a replacement sensor from Mouser.com, which arrived in a few days.  I should have really ordered several, as the shipping cost was substantially more than the cost of the individual sensor.

I purchased some soldering equipment from Frys and enlisted the help of a couple of my friends from work.  No shortage of people who know about soldering here in Silicon Valley.  One coworker had already helped me pull out the pin casing of the damaged sensor, exposing the two pins that had been broken off.  Another provided some heat shrink and resoldered the damaged sensor, keeping the new one as a spare.  We couldn't quite finish the job, as I had to run to pick up my daughter from school.  All I had to do was borrow my neighbor's heat gun (basically a high-powered blow dryer) and shrink the tubing to cover up the exposed solder joint.  Didn't think I needed any instructions for that.  After all, how hard could it be?


Hmm, guess I held the gun a little too close. :-)  Good thing I had a spare.  So the next day I enlisted my neighbor's help on the remaining sensor, and he did an expert job with the soldering.  The picture below is a little deceptive.  The two diagonally opposed corner pins were brought together and soldered to the black wire.  The yellow wire is actually going over one of those two pins, but it's kind of hard to see.  Still not done, though, as the heat shrink I had gotten wouldn't shrink enough for a tight fit onto the wire.


Another day, another trip to Frys for more heat shrink, and a little more help from my neighbor and we finally had the third sensor mounted.  This weekend I should hopefully be able to to finish the build.


Saturday, June 14, 2014

Build issues

As mentioned at the end of the previous post, we did run into some issues that will have to be resolved.  First, we had some problems with the nuts in the extruder assembly.  In the photo below, the six flanges slot into the X axis carriage.  For the single-extruder version, you'd just have the left and right end pieces, with the extruder motor and hot end between them. For the dual-extruder version, the center piece is added to mount the extruders side by side.  The issue is with the two nuts at the bottom between the two end pieces and the center piece.  Those nuts are just sitting there in hexagonal slots formed by the pieces on either side, and are free to move up and down.  The fit isn't super-tight, so a little jostling while mounting the extruder assembly to the carriage can leave them sitting at an angle.


The bolts that fit in these nuts are used to tighten the extruder assembly on the carriage.  But after the two have been connected, it's impossible to see the nuts.  From the feel of things, it seems like the bolts thread into the nuts OK.  When it comes to tightening them, though, it feels like the nuts are turning in the slot.  Because of the lack of visibility, it's impossible to tell exactly what's going on.  One solution might be to super-glue the nuts in place, but that might bring its own issues.  For now, we're just hoping that it's tight enough. 

The next problem came when attaching the second optical sensor.  Here's what the diagram shows:


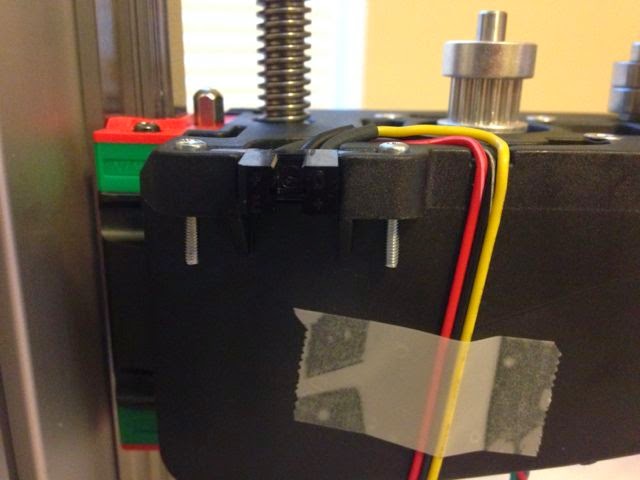
Unfortunately, the 9mm screws that came with the kit aren't long enough to bite, so I couldn't clamp the sensor in place.  Since I live in the US, not Europe, I couldn't find 16mm metric screws to use as alternatives.  I was able to find some English units screws at my local electronics supply store that seem to do the trick, though as shown below they do jut out a bit.


The second problem here was with the wire routing.  As you can see in the diagram below, the wires from the sensor are supposed to lie flat in the groove cut out of the plastic part.  I had a really hard time doing this, and ended up breaking the connection between wire and case on one of the sensors.  The picture above shows my final result with my last remaining sensor from the kit.  Still not flush, but at least I didn't break the wire on the second try.  Now I have to wait for a replacement part to arrive before I can do the third sensor.


Below you can see that the middle (black) wire was just soldered onto two diagonally opposed pins that had been bent in to meet in the middle.  Not very robust to bending.


In fact, on the FelixPrinters web site list of replacement parts, they sell sensors with the appropriate bend for the 3rd sensor built in.

Now I'm in waiting mode until I get my replacement sensor in the mail and have a go at soldering it properly myself.


Tuesday, June 10, 2014

Assembling the Printer, Part I


Saturday was spent cleaning the study to the point where the printer assembly could begin.  Ugh.

Assembly started around noon on Sunday.  Here's the contents of the box, unpacked.


The fasteners came in their own box, sorted in the order called out in the bill of materials.  Nice!


I did a check of the contents of this box vs. the bill of materials.  There appeared to be a few extra fasteners, but I think that may be because I ordered the dual extruder option.  We'll see if I have anything left over when the assembly is done.  One of the items in the miscellaneous bag was a pair of fine tweezers, useful for picking up the tiny nuts and washers.

The instructions are fairly clear, if obviously translated from Dutch.  Lots of good diagrams, and divided into discrete tasks with estimates of time to complete.  The web site said I might need a variable speed drill, but there have been no signs of that yet.  There was one odd tool called out that no one I knew could identify.  I found out to day it is a type of adjustable wire stripper.


 First step, build the frame...


Not too hard.  With the help of my friend Bill, I was able to get through the assembly of the X and Z axis drives without too much difficulty.


One issue we did run into was that the orientation of the Z axis cart wasn't super clear from the diagrams.  One end had just a screw over the real, and the other a knob sticking out.  Our best guess was that the knobby end was supposed to go as shown in the pictures below.


Also, on step 22, where you were supposed to fit the Z-axis carrier on top of the aforementioned cart, we had to use a little pressure.  The cart is rectangular, but the opening that fits over it is slightly trapezoidal.  So you had to fit the wider, back part on first and then depend on some compliance to get the front part to fit over.


This is where we got to by around 5PM.  This was up to around step 70, and about 60% through the entire assembly.  X and Z axes complete, Extruders and some sensors mounted.  Lots of wires hanging around.  After assembling the build platform and Y axis drive, a lot of the rest of the steps are just routing the wires.


Just noticed now that their advertising pictures either conveniently leave out all the wires...


...or present the pretty side, with a lot of the wire routing invisible:


We started running into a few hiccups at the end of the day, which I'll go into in my next post.

First Printed Item

Here are some photos of what the toolbox from the previous post looked like when printed on a Makerbot Replicator 2.  The engraved writing came out pretty well, but the embossed writing on the inside of the lid was a bit ratty.  The guy managing the printer says that was largely because he chose to build with supports, and the letters are at a 45 degree angle, so each letter has its own mini supports which were not really easily removable.  Doing the as a separate piece in the next iteration so that the letters would be straight up and down will probably be more successful.  Also printing the whole thing a bit larger would probably help.


When originally printed, there was a lot of support material holding up the lip of the open lid.  It was too thick to just snap off, so I borrowed a friend's Dremel tool to take it off. 


In this photo you can see I got a little too aggressive and sanded off some of the material that was supposed to be there (bottom right).  I also tried some fine sand paper to see if I could smooth out some of the banding from the print; this caused the ugly marks you see below.  According to a site I found, this is one of the differences between using PLA and ABS filament.  The Makerbot uses PLA only.  ABS is supposed to be easier to sand, and can also be finished using acetone.


I've iterated on the design a bit, but been unable to print it at work, as the Makerbot is out of commission due to a failed temperature sensor.  Hopefully it won't be long until the Felix 3.0 is up and running so I can print at home.


Thursday, June 5, 2014

Hmm, the toolbox image didn't come out in the first post.  Let's see if this works:


Got my 3D printer kit today

My first 3D printer kit arrived in the mail today.  I'm assuming it will be the first of many over the course of the next few decades.  I think this is comparable in many ways to the first computer my family bought when my brother and I were about the same age as my kids are now: an Apple II+.  I'm hoping that this will be as memorable an event in my kids' lives as that was in mine.  Maybe this time I can capture some of the magic.

3D printer kit fresh from Holland

So what prompted me to buy a 3D printer?  I've been reading about additive manufacturing in various forums for several years now, but what made me realize that these were in reach of the average consumer was the Makerbot Replicator 2 that appeared in a demo space to one side of the cafeteria at work, with the message that the folks maintaining it would print any files employees cared to bring in, work-related or not.  Here are a couple things Lockheed Martin is doing related to 3D printing: 


I got to talking about 3D printing with the guys at work, and found out that one person I knew had been playing around with it a fair amount, printing his objects using Shapeways.  He recommended using a piece of software called OpenSCAD to design 3D objects for printing.  An hour or two of checking this piece of software out convinced me that the time was right for introducing this new technology to my kids.  

OpenSCAD is essentially a 3D modeling programming language.  The beauty of this is that it provides almost immediate gratification.  With a few lines of code, kids can make a model that they can then print and hold in their hands.  It has a cool factor that I think is missing from modern introductions to computer programming.  When I was a kid, programming in BASIC, doing ANYTHING on a computer was cool.  Getting it to draw a box on the screen was both easy, and neat.  Today it seems like the barriers to entry-level programming are much higher, and the rewards are comparitively low.  Drawing a box on a screen won't impress anyone.  Coding a box, and then printing it, on the other hand....that's neat.

OpenSCAD primitives are things like box, cylinder, and sphere.  Add to those primitives a few functions for manipulation, rotate, translate, and difference, and you open up a world of possibilities. Kids can learn about programming, geometry, and mechanical design all at the same time.

Here's one of my first attempts.  This was under 15 lines of code.  Make a box, subtract out a slightly smaller one, and you have the bottom.  Do the same thing with a slightly more complex polyhedron and you have the lid.  A cylinder makes the hinge (non-movable in this iteration).  Difference out some text for engravings, add it for embossing.  And then print!  I plan on giving out boxes like this at a competition I'm running to develop tools for a MATLAB library I maintain at work.


So I got to thinking, my kid's school should have one of these printers.  To make a long story short, it's hard to figure out what to buy!  So after looking through Make magazine's 2014 Guide to 3D Printing I decided to buy a printer for myself and use that experience to inform a recommendation to the school.  Last Thursday I settled on the Felix Printers Felix 3.0 with the dual extruder option, and here I am a mere week later with my kit!  The kit with all the options cost about $1900; fully assembled would have been another 450 euros.  When assembled, it should look like this:


I'll talk about the reasons for choosing this particular printer in a later post.